Monday, June 13, 2011

Making Memories {French Memo Board Tutorial}

Our niece, Ashley, graduated from high school at the end of May. One of her gifts was a French memo board I made for her in the colors of her dorm {she starts college this fall}. I did not even think to check blogland for tutorials, and I've never made one. I had one that I purchased brand new, unused at a garage sale 3-4 years ago. It was fucshia pink with orange ribbon. Not my style and not the colors of Ashley's dorm decor. I did not take a before picture of the memo board {sorry, I forgot}. I was thinking more about getting the project done in time rather than a blog tutorial. It hit me after I removed the buttons, removed the fabric panel on the back, ironed my fabric and stapled it on there that I should have taken a picture {Oops!}. Since I have been MIA from blogging, I just was not thinking, but you will get photos and the steps below. :) Hopefully the end result will make up for it.

Materials:
· Inexpensive memo board
· 1 1⁄4 yards fabric of your choice
· Iron and ironing board, optional
· Fabric scissors
· Staple gun and staples
· 5 yards seam binding or grosgrain ribbon, 5⁄8 inch wide, color of your choice
· Covered-button kit with 3⁄4-inch buttons or re-purpose the buttons as I did
· Wire cutter
· Frame hanging wire
· Fabric for backside of board {muslin or cotton sheeting}
· ½ grossgain ribbon to cover staples on fabric on backside of board.
· Fabric glue

1. Remove and discard the buttons and ribbons from the original memo board. Note: If you are using a template board you made, be sure to wrap it in batting and then fabric. I remembered the ribbon pattern as I drew it on a piece of paper so I would know how to place my ribbon {a large "X" and 4 parallel pieces}.

2. Iron your fabric to remove any wrinkles, if necessary. Lay the fabric facedown on a flat surface {if using burlap, you will need to double the fabric so it is not see through}; lay the memo board facedown over the fabric. Cut excess fabric so there is approximately 2 inches fabric overhang on each side of the memo board.

Wrap the fabric to the back of the board, stretching the fabric so it is tight. Using the staple gun, secure one staple at the center of each side.

3. Wrap fabric over diagonally at each corner, and secure with a staple. Neatly fold in the remaining fabric and staple in place. Finish stapling the fabric around the memo board.


4. Turn the memo board face-up. Cut two ribbon pieces a few inches longer than the distance from corner to corner diagonally. Wrap one end to the back, and staple in place. Stretch the ribbon tight to the opposite corner, wrap the end to the back, and staple. Repeat with the second ribbon, forming an “X”. Add four more ribbons parallel to the first ones {this makes a diamond shape when looking at the “X”}, stretching them tight from the mid-points of each side.


I used two different colors of grossgrain ribbon, but you could use all the same color.

5. Insert a staple at each ribbon intersection. I used scraps of 2 inch wide silk ribbon and made five covered buttons, hand-stitching the ribbon to cover the buttons. I attached the buttons with fabric glue hiding the staples at each ribbon intersection. Furniture brads would be another great idea. Because I was gluing buttons on {used fabric glue so they don't pop off like they would if I used hot glue}, I covered the staples at each ribbon intersection with the finished button.


6. I covered the back of the board with fabric I had from a cotton sheet. I used pinking shears to cut it so it would not fray, stapled it in place, and covered the staples with 2 inch blue grossgrain ribbon {I took a photo of the fabric and did not take one of the ribbon covering the staples}. I glued the ribbon in place with permanent fabric glue. The tape on the unfinished board back was to cover where the staples poked through.


Voila! Here's the finished French memo board. {I put the buttons in place and snapped a photo prior to gluing them down}.

Sorry for the lighting in the photos looking so yellow. Batteries were close to dying and I took the photos the evening I made the board as opposed to daylight, which would have made for better pictures! You get the idea...


Pin It

As for our niece, the graduate, she loved it!

Remember, keep it simple, keep it crafty, keep it thrifty, and keep it chic!


I'm linking up to these parties this week. Stop by for some creative inspiration. I'll be adding new party links everyday:

Blue Cricket Design's Linky Party Button is not working so here is the link to her post:
http://www.bluecricketdesign.net/2011/06/show-and-tell-linking-party-5.html


Keeping It Simple


The DIY Show Off


Making


Tip Junkie handmade projects


 http://linda-coastalcharm.blogspot.com/


Photobucket


NightOwlCrafting


Transformation Thursday


HookingupwithHoH

The Shabby Nest

monogram

#ff63e0


Boogieboard Cottage

Thursday, April 21, 2011

Pottery Barn Has Nothing on Me & You!

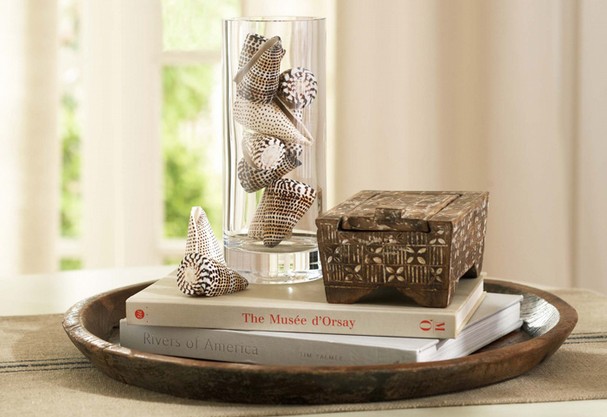
I love Pottery Barn. My heart swoons over the catalogs. Luurrvvvee it! I just don't love their prices. When I received a catalog a couple of months ago showing various shells in vases, I quickly thought, "Hey, I can do that!" I already have shells on hand. Below is the Pottery Barn picture from the catalog {one of them, not my inspirational one :(}...


And here are the 3 vases I created. My apologies in advance for the 3rd photo not turning out so well...


Pin It


Do you have a collection of shells lying around? Get creative and put them on display this summer. I'm thinking a vase of pretty seaglass would be nice or a vase filled with sand and the sand dollars I collected this summer. I want to be careful with the sand dollars as they are oh-so delicate and will crumble. Whatever your taste, whatever natural items you have (rocks, pinecones, etc.) put it in a vase and display your collection. Not sure what to do? If you do not have a PB catalog, log onto their website for inspiration and get those creative juices flowing. I'd love to know what you like to collect and display!

As always, keep it simple, keep it fabulous, and keep it creative!

Thursday, December 16, 2010

Custom Printed Candles

I originally started printing candles in 2009 when I printed the logo I created for our wedding onto our unity candle set {see photo below}. These images and/or text are heat printed into the wax of the candle ~ not a vellum overlay. I sell them on my business website (www.SerendipityBathElixirs.com).


It blossomed into many unity sets for other couples, baby announcements, and now memorial candles.


My first memorial candle was created this past April when my husband's 105 year-old maternal grandmother passed away. I created a large 4x9 ivory candle with sepia tones for my Mother-in-Law and her sister.


And this sweet one as a gift for my church's (denominational) District Superintendant, whose wife passed away after a long three year battle following a devastating car accident. Somehow I forgot to take a photo of the candle, but still have the artwork I created prior to printing. It was a black and white image on a white 9-inch pillar.


Dr. Berry loved it so much, he shared it with his Griefshare group at our church. One was ordered as a gift (black and white on a white candle) and another ordered by a Griefshare group member. This one was printed in Sepia tones on a marble ivory pillar. The acrostic on the backside encompassed his name and her feelings about him. He gave up his life in order for three passengers of the plane to live. A real hero!


I offered a discount to the Griefshare group. I feel blessed to play a very small role with their healing journey. While many choose not to burn the Memorial Candles, some choose to burn them as they say a prayer of thanksgiving on the anniversary of their loved one's passing or their loved one's birthday. It is whatever works with the healing process, and everyone is different with that.

These are some of the other items I've been busy with, which is part of why I was MIA for a bit. And... my sister, Kathi, and I have a store on Etsy. It is an eclectic mix of vintage and antique items, a lot of which came from our parents' estate (SILVER from the 1940s and 1950s!). The site is: www.GRITSgirlz.etsy.com.I created our shop banner and avatar and GRITS ~ because she and I are Girls Raised In The South!

Joy to you and yours this holiday season,

Oh By Gosh, By Golly... It's Beginning To Look A Little Jolly

Sorry to be MIA so long. Between the sinus infection that just won't go away and the holidays, time has slipped by. I was so on top of Fall and the decor to go with it and now way behind on posts for Christmas. Forgive me for that. There are so many cute posts all over blogland right now. I'm going to link up with The DIY Showoff at the bottom. Be sure to pop on over and view the fantastic blogs showing their craftiness this holiday season. Grab your favorite cup of coffee or tea and join me for a whimsical tour of our condo decked out for the holidays. I have no doubt I'll be re-arranging things up to Christmas Eve (except for the hearth and table), but you can see what I've done so far. This year, it is very whimsical.

It has been way too cold in Atlanta this December and we had icy conditions during rush hour last night, shutting down many of our highways and stranding commuters for hours. I was trying to be a good samaritan to one of our neighbors who is single. She turned into our parking area (we are in a condo community) and where you turn, it's sharp and it follows a hill. The ice was too much and she slammed into the curb. Thankfully, she was OK and a neighbor moved her car for her, but in my quest to help her, I stepped off the grass onto the asphalt and yep, you guessed it... my feet went out from under me straight up in the air. I landed on my backside and hit the back of my head. Today, I'm very stiff and moving around like a 90 year-old. I'm on pain meds, icing my head, and heating my back. The ice has thankfully gone away today. My doctor has said I most likely have a very mild concussion. Good grief, Charlie Brown! On with the post...

While I have not posted as I decorated, I have been working on a few projects. One project is a repurpose. I purchased 3 small waxed pumpkins around Halloween. Because they are waxed, they last so long. I painted the stems gold, painted the pumpkins with green acrylic paint (only Christmas color I had on hand) and added red bows. My 3 pumpkins are now 3 "ornaments" for display. Below are the Before & After...


Pin It


Here's one on display under our entry table. I also spelled out "Merry Christmas" with Scrabble tiles on the table. Purchased the game and all tiles for $2 at a recent thrift store visit with my sister, Kathi. No worries, my three pumpkins (um, I mean ornaments) will be tossed after the holidays.


Onto Reveal #2. It's simple and anyone can do it {just like anyone can paint pumpkins}. I took a 3-inch white pillar candle and some Christmas rub-ons. I did not know if rub-ons would work with the wax, but they did. I also added a rub-on (Ho, Ho, Ho) on another candle (no photo yet for that one). Here it is...


Pin It


And now our Mantel. Well... Our entire hearth, actually. I decided against re-using the wine bottles I used {remember my earlier post about them and they spelled out THANKS?}. I used 3 cylinder candle vases (the ones I used in the fall with the leaves and LED pillars). I found some sheet music online (O Holy Night), printed it landscape on vellum sheets (use fast draft setting to print on vellum and let dry), wrapped around each cylinder, and took glitter foam letters that spell J-O-Y. I decorated our garland with ball ornaments, put Christmas lights in the fireplace :), and set up the 2 pre-lit (white lights) porch trees my husband bought me on each side of the fireplace. I added blue lights since I had them already from a small group retreat.I told him it was my nod to his family's team, UNC. His alma mater is actually Auburn (War Eagle!). Our 3 stockings were also hung (we bought a matching one for our dog, Kiley, this year). No big tree for us (there's no room in our condo, really) and less for me to put up and take down. :) Notice the rub-on white pillar on the left side of the mantel?


And a close-up shot of the candles...


Pin It


Here's what I did for our table. Simple. Some tapestry placemats with a snow couple that say, "Let It Snow", white flour sack napkins, candles of all types, a Publix S&P shaker snow couple, a vintage santa & tree S&P set from my hubby's paternal grandmother and the table is set with her china and glasses. From the chande, I put candy canes and a few silvery ornaments hung from it (not in photo). I also decorated the top of our corner cabinet.


Ignore the gift bag behind the table. That thing tempts me everyday. It's for me from dear hubby. We have yet to move it with the other presents for family. My card writing stack is on top of the stool that I should have cleared prior to snapping the photo. :)


The coat closet doors even got decorated. I could not get far enough away for a full shot. I have 2 felt bags with snowmen hanging from the doorknobs. We are into snowmen, can't you tell?!? ;)


Our Sunroom even has a few added touches. A die-cut rustic reindeer over the door and the candlescape has three pearl candy canes hanging from the three candle sconces...


A few random chairs have been decorated...

The director's chair that holds a few blankets and some pillows now holds Snoopy, the Grinch, and Rudolph, too. Also provides extra seating, if needed.


And the rocking chair that my husband's AU blanket rests on is now holding 2 snowmen, Cupid (reindeer) a felt Merry Christmas bag and a girly Santa hat.


I even decorated my husband's toy chest from childhood (holds a few seasonal books and seasonal table linens now)...


And I love this cute little 14-inch rug I found at Target on the cheap. Where to place...where to place...


I'll add more photos when I finish the breakfast bar (it's a crafting area at the moment), our coffee table, and the chairs in the sunroom that my gift wrap supplies are blocking. :)

Thanks for reading my post and following my blog! You make me smile with your sweet comments and e-mails every time I open them. May your holidays be merry & bright...

Help a Stranger
Praise a Child
Light a Candle
Share Your Love
Sing For Joy
Lend a Hand
Pray For Peace
Understand


Here's my link-up list:
The DIY Show Off


May our Savior's love fill your hearts with joy this Christmas Holiday & always,