Monday, June 20, 2011

Tablescapes ~ Patriotic Style

I brought out the patriotic 4th of July decor from storage this afternoon and crafted a couple of tablescapes and a "drink counter". I know it is two weeks away, but I'm patriotic and my Sister-in-law sent me a G-O-R-G-E-O-U-S navy blue patriotic tea towel with fireworks on it for part of my birthday gift from her family, of which I have not taken photos of yet, but it is prominently displayed in our kitchen right now. The main gift was a gift card to Hobby Lobby {I'd say she knows me well ;)}. My apologies to any followers who are not American, but perhaps you will get ideas for celebrations that are specific to your countries. Back to the decor...

Below is how I designed one of the tables {ignore the foam soccer balls, they were in the stash for who knows why?!? ~ Mr. Fabulous said they are from the FIFA Soccer games last year and are to be displayed when we watch the women this year} and I forgot to remove them prior to my photos. The wineglass candleholders I already owned, same with the 8-inch red pillar candle, ribbon, and white milkglass dish that I inherited from my parents {I love, love, love milkglass!}. I also already had the inscribed rocks on hand from Coldwater Creek. The rest was purchased at Hobby Lobby {not with the gift card!}...


I just realized my little wooden flags that were Mr. Fabulous' prior to our marriage are on the display, too {I ended up sticking them in the vase with the flower arrangement, which you will see below}. I also forgot to light the candles for this shot {I'm striking out on this post thus far...wawa}. The whole point of this post is for you to see how cheap and creatively you can pull off a tablescape on the fly.

Details, details... The larger white table mats are stiff felt from Hobby Lobby and I got them half off so they were $1 each! They are 11"x17" in size and my thought was that they can be re-used on Valentines, Christmas, B'days, etc. The flag tablemats are felt and are 8.5" x 11" or close to that size. They are soft felt and I also got them half off for like 25 cents each! The foam stars were also half off for less than $1. The bandana was on sale (think of patriotic subway art). It was less than $1. The tray was from their spring/summer collection and I bought two on clearance for $3 and change. I plan on spray painting them down the road. The ribbon on the candleholders I had on hand already, but I've seen clearance and $1 at Hob Lob, too.

Here is tablescape 2, which is so similar...


The only difference is the milkglass vase is not in this one and a star dish is in its place. The star dish was something Mr. Fabulous owned prior to our marriage. Yes, Mr. Fabulous owns fabulous things and he has great taste {or maybe it is great to me because it is so similar to my own?!? ;)}.

Below is the Drink Counter...


Don't you love the dog bowl that I had unloaded on that counter {it's clean}? The photo displayed is simply an LP Frame I bought at Ross years ago with a patriotic scrapbook page of highlights from the United States Constitution. Thought it would make a nice added touch. The cups are for the hometown baseball team that Mr. Fabulous and I both L-O-V-E: The Atlanta Braves! Besides, their colors are red, white, and blue. Can't get more patriotic than our home team! Bobby Cox, we miss you, but we are adjusting to Gonzalez as Manager. The 2 pillars are from a set of three LED lights for our wedding from a friend {thanks, Ken!}. Notice the wooden flag picks I mentioned earlier? They are in the vase of flowers, which are fake, by the way. The vase is an olive oil jar that I scraped the label off and sanitized. The jars remind me of vintage milk bottles.

Here's a close-up of the scrapbook patriotic page {given to me from my fabulous sister, Kathi's, stash {bad grammar}...


So my point being... use what you have and add to it frugally. Frugal can be chic. It's all a matter of what you like. If you are on the beach, stars can be starfish. You get my point. I'd love to see how you are decorating this 4th of July so post your link in the comments below {I need a Mr. Linky tool, don't I??? And a button for my blog...worked on that button way too long, by the way...).

Remember, keep it simple, keep it frugal, keep it creative, and keep it chic!

Happy 4th of July!


I'll be linking to the below parties... Visit them for inspiration!
The Girl Creative


Keeping It Simple


Making


The DIY Show Off


Tip Junkie handmade projects

<br />http://www.thethriftyhome.com


Linking up to Blue Cricket Designs {her button is having issues so here is the link}:
http://www.bluecricketdesign.net/2011/06/show-and-tell-linking-party-4.html


Monday, June 13, 2011

Making Memories {French Memo Board Tutorial}

Our niece, Ashley, graduated from high school at the end of May. One of her gifts was a French memo board I made for her in the colors of her dorm {she starts college this fall}. I did not even think to check blogland for tutorials, and I've never made one. I had one that I purchased brand new, unused at a garage sale 3-4 years ago. It was fucshia pink with orange ribbon. Not my style and not the colors of Ashley's dorm decor. I did not take a before picture of the memo board {sorry, I forgot}. I was thinking more about getting the project done in time rather than a blog tutorial. It hit me after I removed the buttons, removed the fabric panel on the back, ironed my fabric and stapled it on there that I should have taken a picture {Oops!}. Since I have been MIA from blogging, I just was not thinking, but you will get photos and the steps below. :) Hopefully the end result will make up for it.

Materials:
· Inexpensive memo board
· 1 1⁄4 yards fabric of your choice
· Iron and ironing board, optional
· Fabric scissors
· Staple gun and staples
· 5 yards seam binding or grosgrain ribbon, 5⁄8 inch wide, color of your choice
· Covered-button kit with 3⁄4-inch buttons or re-purpose the buttons as I did
· Wire cutter
· Frame hanging wire
· Fabric for backside of board {muslin or cotton sheeting}
· ½ grossgain ribbon to cover staples on fabric on backside of board.
· Fabric glue

1. Remove and discard the buttons and ribbons from the original memo board. Note: If you are using a template board you made, be sure to wrap it in batting and then fabric. I remembered the ribbon pattern as I drew it on a piece of paper so I would know how to place my ribbon {a large "X" and 4 parallel pieces}.

2. Iron your fabric to remove any wrinkles, if necessary. Lay the fabric facedown on a flat surface {if using burlap, you will need to double the fabric so it is not see through}; lay the memo board facedown over the fabric. Cut excess fabric so there is approximately 2 inches fabric overhang on each side of the memo board.

Wrap the fabric to the back of the board, stretching the fabric so it is tight. Using the staple gun, secure one staple at the center of each side.

3. Wrap fabric over diagonally at each corner, and secure with a staple. Neatly fold in the remaining fabric and staple in place. Finish stapling the fabric around the memo board.


4. Turn the memo board face-up. Cut two ribbon pieces a few inches longer than the distance from corner to corner diagonally. Wrap one end to the back, and staple in place. Stretch the ribbon tight to the opposite corner, wrap the end to the back, and staple. Repeat with the second ribbon, forming an “X”. Add four more ribbons parallel to the first ones {this makes a diamond shape when looking at the “X”}, stretching them tight from the mid-points of each side.


I used two different colors of grossgrain ribbon, but you could use all the same color.

5. Insert a staple at each ribbon intersection. I used scraps of 2 inch wide silk ribbon and made five covered buttons, hand-stitching the ribbon to cover the buttons. I attached the buttons with fabric glue hiding the staples at each ribbon intersection. Furniture brads would be another great idea. Because I was gluing buttons on {used fabric glue so they don't pop off like they would if I used hot glue}, I covered the staples at each ribbon intersection with the finished button.


6. I covered the back of the board with fabric I had from a cotton sheet. I used pinking shears to cut it so it would not fray, stapled it in place, and covered the staples with 2 inch blue grossgrain ribbon {I took a photo of the fabric and did not take one of the ribbon covering the staples}. I glued the ribbon in place with permanent fabric glue. The tape on the unfinished board back was to cover where the staples poked through.


Voila! Here's the finished French memo board. {I put the buttons in place and snapped a photo prior to gluing them down}.

Sorry for the lighting in the photos looking so yellow. Batteries were close to dying and I took the photos the evening I made the board as opposed to daylight, which would have made for better pictures! You get the idea...


Pin It

As for our niece, the graduate, she loved it!

Remember, keep it simple, keep it crafty, keep it thrifty, and keep it chic!


I'm linking up to these parties this week. Stop by for some creative inspiration. I'll be adding new party links everyday:

Blue Cricket Design's Linky Party Button is not working so here is the link to her post:
http://www.bluecricketdesign.net/2011/06/show-and-tell-linking-party-5.html


Keeping It Simple


The DIY Show Off


Making


Tip Junkie handmade projects


 http://linda-coastalcharm.blogspot.com/


Photobucket


NightOwlCrafting


Transformation Thursday


HookingupwithHoH

The Shabby Nest

monogram

#ff63e0


Boogieboard Cottage

Thursday, April 21, 2011

Pottery Barn Has Nothing on Me & You!

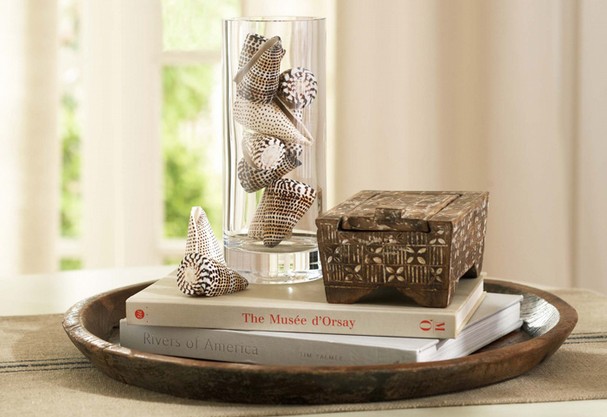
I love Pottery Barn. My heart swoons over the catalogs. Luurrvvvee it! I just don't love their prices. When I received a catalog a couple of months ago showing various shells in vases, I quickly thought, "Hey, I can do that!" I already have shells on hand. Below is the Pottery Barn picture from the catalog {one of them, not my inspirational one :(}...


And here are the 3 vases I created. My apologies in advance for the 3rd photo not turning out so well...


Pin It


Do you have a collection of shells lying around? Get creative and put them on display this summer. I'm thinking a vase of pretty seaglass would be nice or a vase filled with sand and the sand dollars I collected this summer. I want to be careful with the sand dollars as they are oh-so delicate and will crumble. Whatever your taste, whatever natural items you have (rocks, pinecones, etc.) put it in a vase and display your collection. Not sure what to do? If you do not have a PB catalog, log onto their website for inspiration and get those creative juices flowing. I'd love to know what you like to collect and display!

As always, keep it simple, keep it fabulous, and keep it creative!